Tuesday, July 30, 2013

Free Fun with Kids

It's not always easy to occupy the kids and most would think it's not always cheap either.  When we first moved to the city, it was like a huge buffet was placed in front of us and we found so many new things to do that they just didn't have in the country.  And quite frankly, when we lived in the country, I had the misconception that everything in the city had to be expensive.  Although, some things are costly, I was surprised at the number of flat out free things there are in this city.

What you chose to do will depend on what your family likes but, I'm one of those 'mean Moms' who will make you try something once if for no other reason than to say you've seen it or visited it.  And if you learn something on the way, BONUS!

One thing that I think is really cool here is that there are free days (free might not be the best word here as they encourage you to donate a canned good for the food pantry) at The Children's Museum, The Indianapolis Zoo, The Indiana State Museum, Conner Prairie, The Eiteljorg Museum of American Indians and Western Art, IMAX Theater at the Indiana State Museum, and the NCAA Hall of Champions.  These free days are Martin Luther King Day, President's Day, El Dia de Los Ninos and Christmas Eve.  They will be busy but we've never found them too busy to be able to enjoy them.  Something else we like about this is that we've always taken our lunch with us and made a day of it.  We have never had an issue with this, in fact, we've generally eaten in the lunch room they use for school field trips.

The Children's Museum also offers a free evening from 4-8 on the first Thursday of every month.  We have found that this free time is extremely busy.

The new (it's still fairly new) Indianapolis-Marion County Public Library's Central Library is amazing!  Not only is it an amazing facility but there are lots of things for kids to do.

I love the Indianapolis Museum of Art and 100 acres.  I'll admit, we haven't done the 100 acres yet but it's on our list.  I wouldn't necessarily recommend the Museum of Art for little kids but it is a wonderful place with very impressive art collections.

I am very lucky to leave near Garfield Park.  It is not only one of the Regional Parks in the city but it is the oldest park in Marion county.  It is home of the Conservatory and Sunken Gardens.  It's beautiful there.  It's a great place for a nice walk, to enjoy flowers of all kinds.  They also have concerts in the park.  According to my kids, the playground is pretty cool too!

I know this one is a little different, but we found the People Mover when the kids Grandpa was in the hospital.  It actually connects three major hospitals in the city (Riley Hospital for Children, Methodist Hospital and Indiana University Hospital) via an elevated train.  It's pretty cool and kids get a different view of a part of the city.

Monument circle is a given of things to see.  The monument and surrounding statues are beautiful.  For a small fee, you can climb to the top of the Soldiers & Sailors Monument, we did it.  Once was enough for me, it is tight quarters in there!

Home Depot and Lowe's also have free build days for kids.  We have done both but Lowe's requires you to make a reservation, sometimes we plan ahead but sometimes we just wing it.  Home Depot is good for that.  Anyway, the premise is that once a month, they offer a free build for kids.  My kids have made everything from step stools to trinket boxes, even their own coat racks.  They learn to follow directions and use simple tools.  These are free and they get to keep what they make.

Along the same lines as Home Depot and Lowe's, once my teenager began working at the Lego store at Castleton Square Mall, we learned that the first Tuesday of every month, they offer a free mini build.  The kids build a "mini-fig" or a cute little Lego guy and they get to keep it.  Fair warning, the store is small and you will wait in line but it does move pretty quickly.

My husband and I, more so than the kids, enjoy walking on the canal.  We generally park near the 911 monument by the Fire Station on West Street.  The kids tend to get the "I wants" when they see the gondolas or the paddle boats, all of which are pricey and we don't do them.  

We also visit the various monuments around town.  There is Veteran's Memorial Plaza, The Vietnam and Korean War Memorials, The World War II Memorial, The American Legion Mall, The Congressional Medal of Honor Memorial on the canal, The Firefighters Memorial and The Law Enforcement and Firefighter's Memorial.  I'm sure there are more but we've not seen them all yet.

With a little research online, you can find free or almost free things to do almost anywhere.  Even when we vacation, we use the internet to find free, fun things to do where we are going.  It makes for a wonderful adventure!
Sunday, July 28, 2013

The Brickyard 400

If you know anything at all about Indianapolis, you know it's pretty famous for races.  Today was the Brickyard 400, Nascar's offering to the racing capitol of the world!  We don't normally get to go to these races as the tickets at the Indianapolis Motor Speedway are pricey.  

There are ways to make even a trip to the race affordable.  For tickets, we got lucky as Kroger offered a deal this year where if you purchased 5 items from a specific manufacturer and spent $150 in one order, you got 2 free tickets to the Brickyard 400 Nascar race!  

Even if you aren't in Indy and have something special in your town, look at their website, look for free days or discounted days.  Or ways to earn free tickets.  

Other than parking, which cost us $20 because we needed to park in the handicap lot due to my health issues, we didn't spend any money at all at the track.

In a small cooler, we had two frozen bottles of water (not only to keep the cooler cold but to drink later in the day), 2 small bottles of gatorade, 2 sodas, fried chicken tenders, a small dish of potato salad, some caprese salad (grape tomatoes, mozzarella cheese, olive oil, basil, salt and pepper) and some homemade chocolate chip cookies.  We not only had a nice lunch but a snack too.  We found a nice spot in the shade to have our makeshift picnic.  

So my husband and I had a full day out and only spent $20 at the track.  He loves racing is a far more die hard fan than I am but I do enjoy it occasionally.  The weather was wonderful and we had a wonderful day out for the two of us.  And only spent $20.

I'll pass on some more helpful hints about free or almost free things to do around town in a future post!

Wednesday, July 24, 2013

Breakfast on the go

Good morning!  Ideally, we would all get up and have a stress free morning because everyone would have their things laid out the night before, we'd all sit down to a nice hot breakfast at the table together until the time for everyone to head out the door for work or school.  So nice and stress-free.

That's a nice dream but, if your home is like my household, you have hit the snooze at least once, the teen forgot to switch her backpack to hold today's books and not yesterday's, the boy can't find one shoe and hubby has misplaced his wallet.  There goes the idea of a hot breakfast!

Not necessarily.  I keep things in the freezer to help on mornings like this.  When I make biscuits, I'll make sausage biscuits for the freezer, I do the same with a scrambled egg and sausage crumble with cheese on a tortilla wrap and my new one, home made Egg McMuffins (even the egg white one).  

We had one of "those" mornings and hubby was late so he stopped and used a coupon we'd received for the egg white McMuffins.  He loved them.  But if you were to do that every day with a cup of coffee, you'd be spending about $3.50 a day or about $17.50 a week.

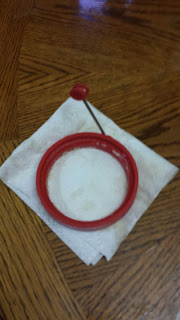
I found this little gem at Walmart and decided I can make McMuffins:


It is silicone and makes eggs the perfect size.  One side makes biscuit sized egg rounds and the other makes English muffin sized eggs.  i think it was a great $6 investment.  (It works for pancakes too)

Next up was to get the ingredients, I managed to get them on sale, with a couple of coupons.

I found English muffins on sale for $1.99 and I had a $.50 coupon that Kroger still doubled (doubling ends on July 31) making them $.99 for a package of 6 or $.17 each.  

I also found Canadian bacon on sale for $2.29, with a $.25 coupon (doubled) making it $1.70 for a package of 10 slices or $.18 per slice.

I got eggs (Eggland's best were on sale) for $2.29 with a $.50 coupon (doubled) making them $1.29 for 12 or $.11 per egg.

Kroger also had a sale on Kraft American cheese for $2.50 with a $.50 coupon (doubled) made it $1.50 for 24 slices or $.06.

My husband prefers the egg whites only so when I separate them I use the yolks to make my Gram's pudding.

So to make an Egg McMuffin exactly like McDonald's, it would cost $.52 each.  If you were to eat one daily, that is $2.60 for a full week.  I think you could add some coffee in there too and it would still come in under the cost of McDonald's.

To put these (or biscuits) up for the week is pretty easy.  I wrap them (just like a fast food place wraps their sandwiches) in wax paper.  The "M" and the "K" are written on the wax paper because I like mine made with the whole egg and the teen prefers hers without egg.


Once you have them wrapped, you can drop them in a Ziploc (be sure to date the bag) and pop them in the freezer.


A little hint, I use wax paper to wrap any sandwich that will be warmed in the mircrowave because they don't get "rubbery" when you warm them like they do when wrapped in plastic wrap or are in a Ziploc bag.  And wax paper is cheaper than baggies.  But putting the wrapped sandwiches in a Ziploc bag helps to not only keep them from freezer burn but also helps to keep a single sandwich from getting lost in the freezer.

You can do this with sausage biscuits, ham biscuits, chicken biscuits or any breakfast sandwich.  It's healthier since there aren't preservatives added, you make it so you know what's in it.  It can be eaten at home, in the car or taken to work and warmed there. It also happens to save a great deal of money, almost $15 a week which would be up too $780 a year.  That's HUGE!

Monday, July 22, 2013

Jam

Back in late winter, when it was so cold out but the sunshine was teasing us into thinking spring was near, I talked a bit about jam.  I love making jam.  I always think fruit is more fun than vegetables.  As a child you always heard, "eat your vegetables, they're good for you" while you were sitting behind a plate of some veggie that you didn't really like (or thought you didn't like).  Whereas, when we wanted a snack, instead of candy or pudding, we were given fruit.  So fruit always stuck as being "fun".  

When I make jam, I think I am taking that fun to another level.  There is so much you can do with jam, and it's all yummy.  And I make a lot of it.  A friend told me that she thought I made it all at once when the fruit is in season and for the most part I do.  

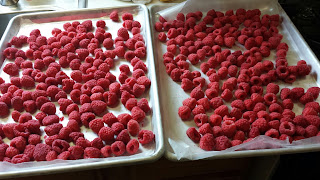
When I get berries especially, I don't always have time to process them all at once.  Here is a great trick that you can use even if you find a really great sale at the grocery or farmer's market.  I found some restaurant style sheet pans on Amazon really cheap, but you can just use your cookie sheet.  I line them with wax paper and I spread the unwashed berries on the wax paper in a single layer.  It's important to wash them before you use them and not before you freeze them because they can get mushy as they thaw if they're washed first.  I put the trays in the freezer until the berries are frozen and then transfer them to good Ziploc freezer bags.  Here's how they look frozen:


This lets me get the most fruit when it is in season and use it as I have time. 

Making jam is easy.  It is simply a matter of mixing fruit and pectin and bring that to a boil.  When it is boiling you dump in sugar, usually a LOT of sugar when it comes back to a boil, you boil it for a couple of minutes.  That's all there is to making it.  Each fruit takes a little different amount of sugar, so I'm not giving weights or measurements of fruit or sugar.  Generally, your pectin will have instructions in it for simple fruit jams.

To can the jam, you simply ladle it into hot canning jars then wipe the rims with a clean damp cloth.  This is important because when you put the lid and ring on it, you won't get a seal if the rim has any fruit on it and your jam will spoil.  Once you're sure the rim is clean, put on the lid (that has been waiting in a bowl of warm water to pre-soften the sealing material) and put on the ring.  Don't over tighten the ring or you can ruin the seal.  The jars will need to process through a water bath canner.  All this really is is a large pot, mine is enamel coated, that has a rack of some sort in the bottom so the jars aren't sitting directly on the bottom of the pot (so they don't break) and is deep enough for there to be enough water to cover the jars by 1".  You boil the water in the canner for 10 minutes and then set the jars out to cool.  Don't fool with them until they're cool.  You'll hear the popping and tinking of the lids making the seal.  It's a wonderful sound.

By putting the fruit in the freezer until I can get it all processed into jam, I'm able to make a bunch at once too.  Don't mind my dog photo bombing the picture!


Jam is also for more than just biscuits and toast or peanut butter and jam sandwiches.  My kids will put a spoon of it in oatmeal or grits or cream of wheat.  It makes a great pancake or waffle topping.  My husband love to melt a little bit in the microwave (it doesn't take long) and uses it as ice cream topping.  I have found many recipes for bbq sauce using blackberry jam.  

Jam is fun, but don't forget to eat your veggies too.  They're good for you!

Wednesday, July 17, 2013

Corn

This is the time of year that I look forward too and dread both!  The garden is producing very nicely at the moment and will continue to do so for a while yet.  This means that I am and VERY busy!  LOL. 

Last night we did our second picking on the green beans and got about 13 pounds.  If canning those isn't enough to do, my husband came home with some fresh corn.  

I don't grow corn.  It takes up a lot of room in the garden and the yield isn't large enough to warrant giving up that much real estate in the garden for it, so I buy it.  I generally buy a bushel or so off of a farmer who has a little roadside stand west of Indianapolis, he's been out there for years.

The difference in handling the green beans is a personal preference for me.  I don't like to can corn.  I don't like how it tastes.  In my opinion, corn is better frozen.  It's pretty easy to do, too!

In my family, the kids get to shuck the corn.  I remember being little and it being fun to do but then it got to where my twin and I were just waiting on our little brother to get big enough so HE could do it...LOL.  I am happy to say that I have continued that tradition and the kids shuck corn.  Yea, I'm a mean Mom sometimes.

Anyway, once your kids have shucked the corn, the blanch and shock method is a pretty easy process to get it ready to go into the freezer.  You'll need good Ziploc freezer bags, Ice and a pan (with lid) big enough to put corn on the cob in and a clean towel.  I prefer a steamer because I think when you boil veggies in water, most of the good stuff (vitamins and minerals) in them stays in the water.  Even if you just go get a collapsible steamer basket and use your big soup pot, steaming is still better.

You'll need to fill the sink up with cold water and add ice, the process here is that once you've steamed the corn, the ice water stops the cooking process.  I lay out the towel on the kitchen table, I'll explain why in a bit.  The pot, if you're using a steamer, only needs 1" of water in it.  If you're not using the steamer basket, fill the pot with water and bring to a boil.  

Put the corn, whether or not the steamer basket is used, in the pan of boiling water, a few ears at a time.  Put the lid on and let it boil for 3 minutes.  When the time is up, put the corn into the ice water. for 3 minutes.  When that 3 minutes is up, place the corn on the clean towel. 

I  put the corn on the clean towel to dry.  If the corn is really dry when you put it in the freezer, it will have less of a chance to get ice crystals on it and will help for the corn that you put up off the cob.

See how easy it was to blanch and shock the corn?  Now you're ready to prep it for the freezer.

For Corn on the cob, just put a few ears into good Ziploc freezer bags.  Don't over fill the bags.  I like to keep it at 5-6 ears per bag so that the bags will lay flat in the freezer and I can stack them.  Try to get as much air out of the bag as you're sealing it.  Once they're bagged, they can go in the freezer.  

There is no need to thaw the corn on the cob when cooking it.  Just put the corn into a pan of cold water, cover it.  Put it on medium heat until it comes to a boil.  Let it boil for about 5 minutes and you're good to go.

For Corn NOT on the cob, there are all sorts of gadgets and gizmos to remove corn from the cob.  I'm guilty of buying one or two of them.  You know what I use?  A thin paring knife.  You know those little cheapy ones you're given when a store has a "Come to aisle 15 and hear a guy try to sell you the latest Ginzu knife and you'll get a free gift" promo.  Yes, that is what I use.

Once the corn is dry, I use our popcorn bowl and place the stalk end in the bottom of the bowl and use my small paring knife to gently cut the corn off the cob.  It's a pretty quick process and you just move on to the next ear.  You'll need to move the corn to a different bowl so that you aren't trying to cut corn off the cob while it's in 3" of corn kernels.  Once you have all the corn off the cob, just put it in good Ziploc freezer bags.  You do have a choice here, you can put it in one gallon Ziplocs and just remove what you want for each meal but this will require you to be diligent in making sure the bag is sealed well with as much air out of it as possible when you put it back in the freezer.  Or, you can put it in meal size portions in quart-size Ziploc bags.  Again, try not to overfill the bags so that you can make them flat and stack them in the freezer.  **NOTE-once you cut corn off the cob, it will not be dry and you do not want to lay it out to dry.  Once you cut if off the cob, it needs to go into a bag.

If you don't get corn by the bushel, you can do the same thing with corn from the grocery or produce stand if you get a good quality corn in season.  The key here is good quality.  If you put sub-standard produce in the freezer, it will NOT get any better.  Keep that in mind.

Even if you're not up for trying to can anything yet, freezing is pretty easy to do and if done correctly, you'll have a product that comes out of the freezer just as good as the day it went in!


Coupons-update

I wanted to post a quick update to my coupon entry.  I said I was going to try to keep an open mind until I'd actually been to Kroger and checked out their new prices.  

First, let me say that I did see quite a few items that had prices lowered.  Some of them I was pleased with, some not so much.  The biggest impression that I came out of there with is that I think it will be confusing.  They have their regular priced items.  They have "new lower priced" items.  They have "new lower priced for the summer" items.  They have "new lower priced sale" items.  Clear as mud, right?  So they have some items that don't change, some that change each season, some that change weekly.....This will be fun to keep track of.  When I asked an area manager about this, he stated that you need to look for the colors.  I haven't figured them all out yet but some are yellow, some blue, some red and all will require the use of your Kroger loyalty card. 

This is gonna take some getting used too although, I still think I'll save quite a bit of money without double coupons by using my Kroger card.

I spoke with one of the cashiers that I know has worked there a good long time and I believe she might even be a supervisor, I'm not sure of that though.  Anyway, I asked if I could get a copy of the new coupon policy so that I could be ready when the changes take effect.  I want to work within the rules.  I was told that they could give me a copy of the coupon policy but that it would be the old one as they don't have the new one yet.  It rolls out in two weeks, one would think they'd have store personnel getting familiar with the new policy.  I was told I wouldn't be able to get one until at least August 1st.  

So as surprised as I was with some of the lower prices, even though I'll have to figure out the color-coded system, I am really confused as to why a copy of the new coupon policy isn't available.  Do they not have one?  One would think that they would have this available for customers to also familiarize themselves with it.

I don't coupon shop without making sure I have a copy of and being familiar with the coupon policy.  And I don't shop without coupons.  So, until I see the new coupon policy, I will continue to be patient and open-minded but will put off shopping Kroger until I see it.

So, overall...some changes are good and some we are still waiting on the information to make the decision as to whether it is good or not.  

Maybe, I'll share this with Kroger and see if they can shed some light on it!


Thursday, July 11, 2013

Coupons

I have been stewing for the past couple of days about Kroger's announcement that they will no longer be doubling coupons.  I am a couponer.  There, I said it!  Some will say I am an extreme couponer.  I do agree with that to an extent.  I am, however, not one of those extreme couponers.  You know the type I mean, the stereotype that people now have of couponers based on that wretched cable show.  

That show isn't real.  It's common knowledge that grocery stores suspend their own coupon policies to be featured on the show.  It's also totally ridiculous to stockpile the quantities of items that those on that show do just because you can.  I mean, really, a male freshman in college with 300 some packs of feminine hygiene products.  Really?  

As I have read more and more about the Kroger decision (it appears to be one of the last stores who does double coupons), each article has comments after it slamming ALL couponers as shelf-clearing, coupon-policy abusing, hoarders!  I am none of those.  And I don't know anyone who is either.  Couponing isn't my career, I have a family that keeps me plenty busy.  I don't spend 40+ hours doing it, I don't buy coupons, I don't self-clear (My 9 year old will tell you that infuriates me, get your deal but leave some for others), I don't hoard, I don't buy 27 Sunday papers either.  There are a lot of things people think of couponers that we're not.

I am someone who shops on a budget.  I am someone who works very hard to provide for my family on that budget.  In today's economy, everyone is working very hard to make the same (or less) money go as far as it used too before all the prices went up due to the high gas prices but never came back down, when the gas prices did.  I have never gotten $1200 worth of groceries for $4.39.  It'd be nice, but that's never happened. Ever.  Between my loyalty card and my double coupons, I generally average about 35-40% in savings a week and I'm thrilled with that!

I have gotten some items for free or almost free.  I do have a stocked pantry and freezer.  Most of the couponers I know, myself included, donate a LOT.  I know a woman who stalks the sales at pet stores with coupons she gets from friends and family and donates every bit of what she gets for almost free to the animal shelter.  I regularly donate HBA (Health & Beauty Aids) items to the local pantry my family volunteers in.  Another benefit I find in keeping a stock is that when someone in my Mom's group is in need (job loss, death in the family, illness, etc.) I can quickly put together a care package of items that will make some meals to be delivered.  I don't always have an extra $50 to get a little bit of groceries for a family in need but I always have my stock.

Back to Kroger.  I don't like that they will stop doubling coupons but we'll deal with it.  I am going to have an open mind and go see about these "new lower prices" and if they're not at my purchase price with a face value coupon, then I might have to look around for the store that gives me best deal.  Because, like I read on one of the articles, although I have been a loyal customer of Kroger for most of my adult life, they're not appearing to be loyal to the couponers.

Ok, my rant is over.  

Monday, July 8, 2013

Green Beans!

It's that time of year!  The garden is starting to come in.  The early stuff that I don't put up, the things we just eat straight from the garden, has come in beautifully.  We've been eating lots of fresh lettuce, spinach, radishes and cucumbers.  I have tons of good size tomatoes but none are red yet.  My son is just waiting on cucumbers and tomatoes mixed with vinegar and water.  We plant a grape tomato plant just for him because he likes to grab a few while he's outside playing.  

Over the weekend, in the sprinkling rain, we got our first picking of green beans.  I plant Blue Lake Bush Beans and if you are careful in picking the ripe beans, you can get a second picking off the plant.  Our first picking yielded 12 pounds of green beans.  It was time to can them!

Green beans are one of the more time consuming things to can, in my humble opinion.  I wash them after I pick them and again after they're snapped.  There always seems to be crud on them if I don't do the two washes.  My husband and I sat and snapped the ends off and snapped them into bite sized pieces.  I know some people cut them but we grew up watching our Moms and Gram snap them, so that is what we do.

After snapping, I cold pack them.  That means I don't get the beans hot before I can them, I pack the washed beans into hot jars and then cover in boiling water.  Some people add salt for flavor, due to health reasons, I don't do this.  Besides we don't need extra salt in our diet!  After putting the lids and rings on, they go in the pressure canner.  I know way back when, people would can them in a boiling water (water bath) canner and boil them for 7 hours or more.  THIS IS NOT SAFE!  Botulism is nothing to mess with.  I'm sure there are older generations who will say they've done this for years.  In reality, they've played Russian roulette with their health.  Don't do that!  Use a pressure canner!

I got my first nine jars ready to go, I only prepare what will fit in the canner at a time.  I got it started and found that the gasket on my canner failed!  My husband joked that it was only "30 years old".  It's not that old, but he's not far off...LOL.  As with most of my canning equipment, I got it used.  It was almost brand new when I got it but it was used.  So, all in all, 20 years is great for a gasket to last!  Thankfully, a friend loaned me hers (Thanks again Tracy!) so I could process my beans.

I've heard so many people say they're afraid of pressure canners.  They've heard horror stories of them blowing up.  Way back when, there were accidents with them but the new ones have built in safety features that prevent that.  There are pressure valves and safety locks.  If the canner is under pressure, you can NOT open it.  The best advice I can give you is to follow the instructions for the canner.  Even if you buy a used one, you can Google the instructions.  I do suggest that those new to canning start with things that you can process with the boiling water (water bath) method.  You can move on to the pressure canner after you get the canning process down!

After loading the canner, bringing it to pressure and processing the required 20 minutes and repeating this process until I'd worked through all 12 pounds of beans, we have 30 jars of beans canned.  

Why go through all this?  Because there is nothing like opening a jar of green beans in the middle of Winter and them tasting like someone had just came in from the garden with them.  They are THAT good!

Now, come on sunshine!  I need some tomatoes!
 

Saturday, July 6, 2013

Planned-overs

It seems, at least in my family, that no one likes leftovers.  Eating the same thing two days in a row elicits groans around here.  I remember growing up eating leftovers and not liking it much either.  Leftovers make you think of meat being dry and veggies and sides being overcooked and, well, icky.  

Years ago, I started working with "Planned-overs".  Planned-overs are the remnants of a prior meal reincarnated.  My family hates leftovers but doesn't even notice planned-overs and when they do, they like them.  They've even come to recognize when some meals are served that there is a favorite meal  coming up.  

The main thing that I plan-over is meat.  I have beef butchered so I always have roasts cut to be on the larger side.  At the grocery or butcher, you can just get the biggest roast that your family can use.  I also buy the largest chicken.  When I find pork tenderloins on sale, I buy a large one of those too. 

Now, don't just go out and buy the largest side of beef you can find, there is some planning to this, hence the name, planned-overs!  For this to work, it starts with your meal planning.  You have to consider several things:  What your planned-overs are going to be?  How long between meals will there be?  If it is more than a day or so, how will you store your extra?  I generally try to alternate meals through the week, beef, chicken, pork, meatless, etc.  This isn't a hard fast rule but I do try to keep some variety in the meals.

For beef, I like to start with a large roast made in the crock pot with potatoes and carrots.  Make sure that you don't go overboard with the veggies because we're not working with them for planned-overs.  With the extra meat, you can plan to have beef Manhattans in a day or so, or you can freeze it for later use.      If you are going to freeze it, don't just toss all the meat in the freezer, judge what you'll need for meal and separate it.  For us, a large roast will feed us the pot roast meal, followed by Manhattans, there is sometimes enough to make bbq beef as well.  Keep in mind that any tidbits left from the roast of the Manhattans can be put in a Ziploc to use later for Vegetable Beef soup.  So if you think an $18 dollar roast (I looked at random large roasts at Kroger last time I was there) is too expensive for a family of 4 for a meal, you're right.  But if you consider that same $18 roast would feed your family of 4 up to 4 meals, that is $4.50 per meal which is much more budget friendly.

For chicken, I try to get a large chicken to roast.  I was lucky enough to have a rotisserie given to me and I love it!  I can get a rotisserie chicken like you get in the store but it is bigger and I control the salt and what seasonings are put on it.  Chicken can be eaten that night with a nice baked potato and a veggie.  The extra chicken can be divided into two other meals if the chicken was good size.  I will use it to make chicken a la king and chicken and dumplings.  Again, if you have little tidbits left, you can put it in a Ziploc in the fridge to use for chicken and noodle soup.

A pork tenderloin on sale is a favorite of mine.  It is much leaner and no bones.  I will slice some of it into chops to grill.  The rest of it I will put it in the crock pot with a little apple juice.  This can be eaten as is or when it is done  you can use a couple of forks to shred it and add BBQ sauce for pulled pork sandwiches.  Any extra pulled pork can be put up in a Ziploc for sandwiches on the weekend.

When I find ham on sale, I buy a big one and have the butcher slice 4 or 6 ham steaks off the larger end, depending on how big the ham is.  I will package the slices in 2 slices per Ziploc bag which is a meal for us, so 2-3 meals with the steaks.  I will bake the ham and whatever we don't eat with dinner, I will cube up.  Some of it's uses are ham scalloped potatoes, ham, O'brien potatoes and eggs or even to add ham cubes to ham and beans if you don't have a ham hock big enough to cut the meat off of.

Some veggies I do plan-over.  I grow and can green beans and a pint jar isn't enough for our family but a really full quart is too much.  So I will plan green beans one day and then again a day or so later.  You can also use some of those ham chunks or the tail end of the ham itself to flavor those beans.  

You can even mash some extra potatoes for dinner and use the extras to make potato pancakes.  Mashed potatoes can be used to thicken potato soup or other cream soups.  

I know this one will sound odd, but I save bacon grease in a mason jar in the fridge.  Those of you older than 40 and from the south will know why.  For those who aren't either of those, bacon grease is a great flavoring.  My Gram used to fry almost everything in bacon grease.  We know that's not exactly the healthy way to do it.  You can however use a healthier oil and a tablespoon of bacon grease to add flavor without having to fry it entirely in bacon grease.  In a pinch, I have also added a tablespoon of bacon grease into green beans to flavor them.  Fried chicken made in Crisco or some other vegetable shortening and a tablespoon or so of bacon grease makes it taste like Gram made it.  I fry potatoes the same way to have with ham and beans. I use it in moderation but I couldn't imagine cooking in a kitchen without bacon grease.

So planned-overs start with your menus.  Figure out what meals your family likes, how you can  use your food to its fullest by stretching and turning it into a new meal.  Start with one planned-over meal at first until you get the hang of it.  You can do it!


Tuesday, July 2, 2013

Leftovers

I don't use the term leftovers in the way that most people do.  Most of the time I have "planned overs" that are a part of dinner that I intentionally planned to have extra to turn into another meal at a later time.  When I talk about leftovers, I mean that little bit that is left that generally just goes into the trash.  

I was thinking about this last night when I was making dinner.  One of the kids had a friend over so I needed to make more than I usually would but doubling what I was making would have been too much.  Let me explain, I have a cow butchered every year and have it packaged in ways that suit my family that I cook for on a regular basis.  So as I thawed out extra hamburger last night, I took the extra I didn't need and fried about 1/2 pound of it up to be added to spaghetti later this week.  Spaghetti doesn't need a full pound of hamburger so that 1/2 pound goes in the freezer for later.  When we have spaghetti, I don't mix the sauce and noodles before serving.  This way, when dinner is over, the sauce that is left, can be saved. 

Here's how I do that.  I keep a Mason jars in the freezer that I add little bits of leftover sauce too.  Once it is full, we have a "free" spaghetti dinner.  First, label anything you put in the freezer.  Second, don't tighten the jar lid all the way so the jar doesn't burst, if you're leery of using a jar, you can use a Ziploc bag.  

I use good Ziploc freezer bags for doing the same thing with leftover taco meat, sloppy joes and pulled pork.  These can be used for weekend lunches or you can add to them until you have enough for a meal.  

More on leftover bits and pieces.  I save leftover veggies in a bag and I also save leftover bits of beef (steak, roasts, whatever) and chicken (in different bags).  The beef and the veggies will make a quick veggie soup by adding a little broth and some barley or even just alphabet noodles.    The chicken bits can quickly be turned into a ton of chicken dishes.  Whether you make a cold item like chicken salad or use some broth (homemade frozen or store bought) to make a quick chicken and noodles or dumplings.  

The big thing I will say about the above practices is to be sure that you label everything.  Not just with what is being stored but the date that you initially put it in the freezer.  I don't let things stay in there more than a month or two before I use them.  I know these hints aren't for everyone but for those looking to stretch their food budget, every little thing helps.  These are things I started doing long ago that have just become habit.

Something else that is cool too is to take leftover broth and freeze it in ice cube trays.  When they are frozen, pop them out and put in a Ziploc in the freezer.  These are great to use when making gravies or for seasoning potatoes or rice as you cook it.

More on Planned-overs later!