Wednesday, May 28, 2014

Getting the garden in!

As I share this year's garden with you all, I remind you that this garden is different than in year's past.  Sometimes, I feel like I am harping on this but I really, truly want to show people that you can garden no matter what.  You just have to find the way that works for you.

In deciding how to do this, without having to spend a lot of money in building raised (off the ground) beds or giving up being able to grow enough to put some veggies up for Winter, I found that I have gone back to the beginning.

Sure, my family gardened but it was not at our house, more of a community garden for the family at my Uncle's place.  There were so many adults that we were usually relegated to playing with our cousins and such.  Oh, and shucking corn.  That was ALWAYS a job that was left to the kids.  A job that my kids now do.  

When I first tried my hand at gardening as an adult, it was an abysmal failure.  I had no idea about soil consistency and that it's extremely hard to grow things in clay.  Even the weeds wouldn't grow in the clay.  I was crushed.

When we moved to a different home, I had the luck of not only not dealing with clay soil but that there was already a garden spot at the home.  I thought if there was a very, well used garden spot that a garden must have been successful there.  

I still remember as I was working on that first garden, I had my first garden book out, carefully writing down what I planted in each row.  A neighbor stopped by and was so amused that I was writing things down in a book.  He'd never seen anyone make a book.  At the time, I had no idea what the plants looked like so I was going to improvise.  I looked things up in books and copied them and pasted them next to my notes in my book.  Hey, I didn't want to pull up the plants thinking I was weeding...LOL.  

I also planted the plants and the rows far enough apart that I could take my little roto-tiller to weed not just between the rows but also around the plants (I hadn't learned to work a hoe yet and had a habit of chopping down plants...LOL).  I would weave between the plants up one way and the opposite back down the other.  No weeding necessary.

Anyway, I decided that this year, I would go back to those basics.  I did so because if I can't get out there to weed, I can at least take the outside tines off the roto-tiller I have now and weed in the way I did in the beginning.

Also keep in mind that you don't have to plant the entire garden in one day.  As you saw in my previous blog about container gardening, I did a little at a time.  I started with the containers and even those I planted over two days.  

Here's how the big garden went in.

Day One


Tomatoes:  Big Boy, Early Girl, Super Fantastic (my son's choice), Yellow Jubilee (Hubby's choice), Grape (also son's choice) and a Beef Steak variety

Day Two


Cabbage, Cauliflower, Broccoli, Sweet peppers, Jalapenos and Sweet Potatoes

Day Three


Although you can't really tell it, this is a row of cucumbers, a row of cantaloupe and the rest of this bed is green beans and corn.  This took all day for me to get it in.  Getting this many seeds in the ground is hard on the back.

Day Four


The rains came.  With hail.  Lots and lots of rain.  And hail.

I was convinced that I was going to have to replant the entire thing.  I was sure the seeds would be washed away and the newly planted plants ruined.  I was sure.

One week later


Corn, it's about 1 1/2 - 2 inches tall


Green beans, about 1 1/2" tall


On the left are onions and on the right are carrots (they need thinned...LOL)


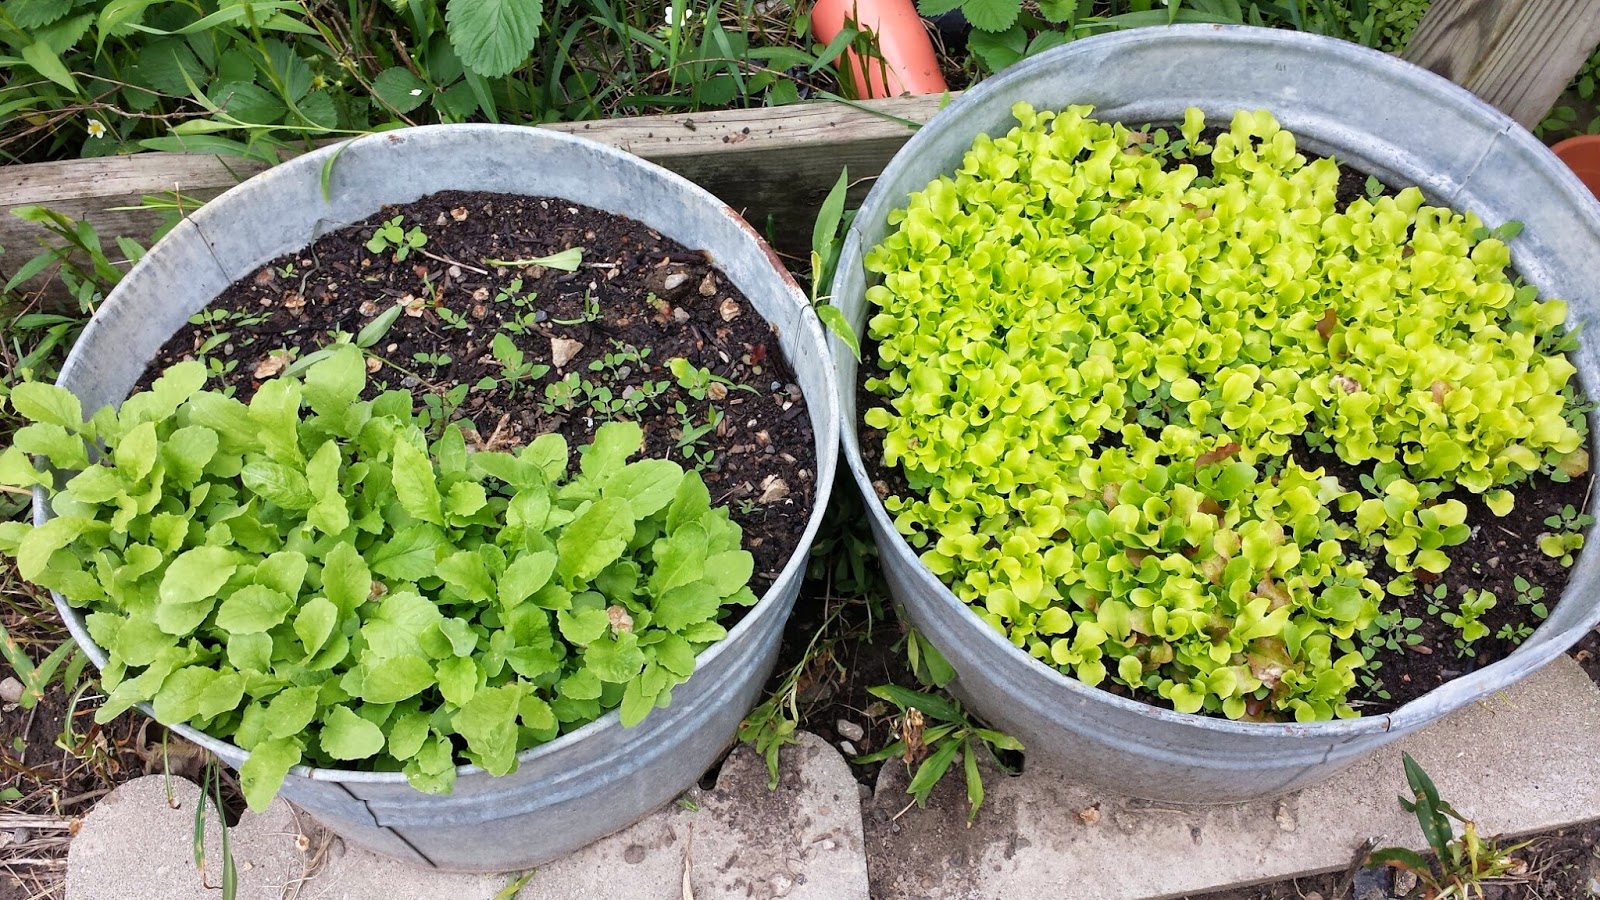
One the left are radishes and spinach (hopefully) and on the right are the lettuces.  

So, everything survived the monsoon and hail we had.  I've left enough room between everything so that if (when) I get weeds, I can just run the tiller over them.

I'm looking forward to dinner tonight, I am going to cut some of that lettuce, pick a radish or two, I have carrots in the fridge and I grabbed some fresh tomatoes and cheese at the farmer's market this morning.  I'll grill a steak and dinner will be grilled flank steak salad.

So, how is your garden doing?  It's not too late to plant some things.


Monday, May 26, 2014

Happy Memorial Day!

Happy Memorial Day!  On this day that is generally thought of as the first day of Summer, I'd remind everyone to remember why we have this holiday.  Let us remember those who gave their lives for the freedoms we enjoy daily.  

I hope you are all enjoying this beautiful day!

Friday, May 23, 2014

After the Reception!

As I wrote about a couple of posts ago, the Hubby's reception was wonderful.  Even with the best laid plans for the food, there were leftovers.  Lots of them.  I tend to be a "have it and not need it" instead of a "need it and not have it" kind of person.  So, as far as food went, we didn't run out of anything but I did have leftovers.  I threw away as little as possible.

The sandwiches were easy enough, they were pre-made and in trays so when we got home, I just took the trays and covered tightly with foil and popped them in the freezer.  It will be easy on a weekend to pop a tray in the oven and have a quick, ready made lunch.

I took the left over veggie tray items and put them up for future uses.

The broccoli and cauliflower that were left, I steam blanched and then shocked them in ice water to stop the cooking and put them in good Ziplocs.  Pop them in the freezer for dinners later.

The sweet peppers, I just tossed into a Ziploc and popped them in the freezer to use for things like fried potatoes with peppers and onions or even just as additional seasoning in soups or stews.

I took the baby carrots, for some unknown reason, I bought FIVE pounds of these.  I have no idea what I was thinking...  Anyway, I cut them in half and ran them through a quick steam blanch and ice water shock.  Afterwards, I did let these air dry on clean towels so that I could put them in a large Ziploc and not have them end up as one large, cinder block-sized hunk of carrots.  They won't stick together if they're dry and I can pull out what I need.

I thought the grape tomatoes would be the hardest to deal with.  Of course, I bought a ton of those as well.  It seems you either buy a small one pound container or a big three pound box.  Evidently, people don't care for grape tomatoes as much as my son and I do.  I found this amazing recipe for pizza sauce.  It was a recipe for pasta but once it was done, it just tasted like it belonged on pizza.  It makes about 4 cups.  It's a recipe from Emeril LeGasse, here it is.  I made it and I did boil some pasta for a lunch but it was so good, I put the bulk of it up and we will have it on pizzas.


I pulled the fruit off the kebab sticks to just put in a bowl in the fridge as fruit salad but my husband and son picked out all the strawberries and made strawberry shortcakes for a snack...LOL.

I even took the extra Buffalo Chicken dip and the Spinach-Artichoke dip that I had made (This was the extra that was never heated up) I put in Ziplocs and put in the freezer for snacks later while watching a movie or a race or what have you.  By putting this extra dip in the smaller freezer bags, you don't have to heat up a whole lot of it at a time.  I also froze the left over salsa that I had made in Ziplocs.  

So, instead of just tossing so many extras with a little time and effort I have a few lunches, pizza fixings, side dishes and snacks for a later time.  Bonus!  

It is nice as well that since we camp, I have the left over plates, flatware, cups and napkins to put in the RV.  I won't have to do dishes when we camp.  Double Bonus!


Sunday, May 18, 2014

Fix it don't replace it!

It's no secret, I'm a tight ass....ummmm, I mean frugal, very frugal!  I love bargain hunting.  A while back, I found this great Wilson's Leathers laptop bag, it is actually called an "Icon Motorsports" Tote Purse and Laptop bag.  I love this bag!  I found it at a Goodwill half-price day sale and bought it for about $4.00.  Here is a picture of it I found on the Internet of how it looked when new.  


It's big enough to carry my normal "purse junk" and I can tuck a notebook and text book in or my tablet to take to class with me.  I won't lie, I carry a lot of "purse junk", my friend Peggy has said more than once she just wants to turn my bag upside down and empty it just to see what is actually in it...LOL.

Anyway, carrying all that junk put some major wear and tear on the handles.  Not only do they not make this bag anymore but the company is listed as being 'defunct' now so matching the straps to have it professionally repaired more than likely was NOT happening!  A couple of weeks ago, while in Lowe's with my husband, I got a brilliant idea.  My husband has learned to kinda hear me out on these ideas and will actually help me with the less hair-brained ones...LOL.  I was going to fix this rather than to try to find another bag I loved.  We found some screws that matched the rivets on the bag pretty closely.  


Forgive the dust, I didn't think to take a picture until after we'd drilled the first hole.  But this is what happens with it being loaded heavy and tossed around by the handles.

After actually emptying it, that took a while as I figured I'd clean it out while I did so...LOL.  Then my little Dremel tool was small enough and powerful enough to do the job in the confined interior of my bag.  We drilled a new hole in the leather, through the handle and the bag itself.  Sorry, there is no picture of the drilling as it took both of us to hold the bag open, the strap straight and actually drill the hole.

After drilling the hole, my hubby put the screw through and put a cheap nut on it.  


He did this so that he could use the Dremel cut off wheel to cut the extra length off the screw.  He said that doing it with a cheap nut on it would allow him to smooth down any little burr on the screw as he took the cheap nut off making it easier to put the permanent one on.


Yup, sparks flying out of my purse!  LOL.  After he cut the excess length off the screw, he took the cheap nut off and put the finish nut on.


I chose this nut because since it is rounded, I won't scratch myself or snag anything as I reach in and out of it.


I have added a little more life to my favorite bag!  To replace a leather laptop bag could be up to $300, I fixed my old one for under $7.00.  Is it perfect?  No but I am more than happy with it.  And I'm confident that it will last me at least until I finish college in a year!

Saturday, May 17, 2014

2014 Container Garden

I know I've mentioned a couple of times that I have to change how I garden and my garden layout to make it easier on me.  I don't want to sound like I'm harping on this but I really do want to help others (and myself) to understand that just because I can't garden the traditional way doesn't mean I can't garden.  And it doesn't have to cost a small fortune to do it either.  You just have to improvise.

It's rained here for days so we've not been able to get the final tilling done in the garden in order to be ready to plant.  If the weather man is correct, we are going to have some nice days in order to dry out a bit and get that done.  I am hoping that I can plant by Tuesday or Wednesday.  We got out to my favorite plant farm, Cox's Plant Farm to get my plants and seeds, so I am ready.  I just need the weather to cooperate!

I used to have gladiolas planted on either side of my back deck steps.  A wonderful neighbor gave me some bulbs as he thinned his, assuring me I couldn't kill them.  What do you know?  He was right...LOL  As pretty as they are, I pulled up the ones on one side of the steps so that I could put in some containers for some veggies.  I put them on the far side so that they are less noticeable since I didn't go buy all new, matchy-matchy pots for my veggies.  I used stuff I could find around here.  

I started with some old toy totes we had in the back yard from when the kids were little.


This old green tote is 3 steps high compared to my deck steps, I put a mix of compost and some sand in it and that little bit of green you see are carrots coming up.


This old purple tote is just slightly smaller than the green one, in it is just compost and those dots in it are onions sets.


These two old metal wash tubs were formally used in an attempt to have flowers out front.  It was an unsuccessful attempt...LOL.  Now, the one on the left has Spinach int he back (it's not up yet) and radishes in the front.  Yes, I know, they need thinned, I'll get to it.  In the bucket on the right is leaf Lettuce.  Currently, it is about 1 1/2" tall and looking good.  I generally plant Mesclun lettuce but I was using up seed packets and this is still a yummy mix of leaf lettuce.  I can't remember the name but I like it because you can cut it with scissors before dinner and it will continue to regrow where you cut it.  An almost endless supply of lettuce!

I have also re-purposed several old flower pots in order to grow some herbs.


As you can see from my terrible attempt at labeling the inside of the pots after they were planted, these two pots hold Dill and Basil.  Dill is usually better planted in the ground but we're gonna give it a try in a pot anyway.


More flower pots of herbs.  The big green one is Parsley, the little green one is Oregano.  The bigger white one is Chives and the smaller white one is Thyme.  Thyme is new for me to grow so we'll see how it goes.  Around here, everything is an experiment!

The herb pots are on my deck on either side of the steps.  I did this so that they are waist high for me to weed or harvest and if I am having a really bad day, I can sit on the steps to do it.  The other pots with the other veggies in them are tall enough that it should be easy to tend too.  And again, if I'm having a bad day, a small stool sat next to the pots will allow me to tend to those easily.  It's all about adapting to what I need.  

I won't be able to grow as much produce as I normally have in the past but any fresh produce is great produce.  And it is that much less that I am buying.  All of the seeds and the onion sets used in the buckets pictured costs less than $10.00.  The compost was from the compost pile I had to move when we had to move a fence section...so it was free.  The amount of lettuce alone that I will harvest from these pots would have cost more than what I paid for all the seeds/sets.  And I will still be able to put up a lot of the herbs and some veggies to be used throughout the year.

I have the plan on how I will put out the other plants and seeds in order to be more manageable for me.  I will share pictures of that as I get it planted.  


Wednesday, May 14, 2014

Reception!

I know it's been a couple of weeks since I've chatted, well here anyway!  Lots of crazy things going on.  It was the end of the semester for me.  The end of my husband's first semester of teaching at the local college.  Of course, as with anyone with children there are spring sports, spring concerts, proms, etc.  Thank the Lord that the cold, snowiness of winter finally broke and Spring truly is here now.

For us, the big Spring event is usually the garden.  I've alluded to the fact that we're changing how the garden is being done to make it easier for me to handle it with my health.  We usually get it all in on Mother's day but that is on hold for a week or so.

This Mother's day my husband graduated from Purdue University.  I can't begin to tell you how proud I am of him.  In addition to the actual commencement ceremony that was held on Mother's Day itself, we put on a reception for him.  I say "we" because I had a lot of help.  Our Village really stepped up.  Yes I believe that our village includes more than just those helping with kids, our village may not be related to us by blood but they are, more often than not, more of a family to us than our blood family.  And we have an awesome village!

I rented the small water front pavilion at the White River State Park.  I highly suggest if you get the chance to go check out this park that you do so, it's free and gorgeous and right in the middle of downtown.  It is centered between the Eitlejorg Museum, the Indiana State Museum, NCAA Hall of Fame, Military Park, the Indianapolis Zoo, the White River Gardens, and Victory Field Ball Park.  The Convention center and Lucas Oil Stadium are within walking distance too!  It's really beautiful.


This is just a view of one side of the pavilion.


This is one of the lower conversational areas
I do have to say that these pictures were taken before the Spring clean up and flower planting was done.


A beautiful view of the city


This is a view from the old US 40 bridge that shows the greenhouse behind the pavilion and there were gardens there too.  Beautiful.

When you plan an event, don't be afraid to do the work yourself and include your village.  Just be sure that you are giving to your village as much as you lean on them, it is a two way street here.  As to the hardware, I had a couple of banquet tables for the food.  From friends, I borrowed a couple of steam tables, glass drink dispensers, and some serving trays.  On Pinterest, I found a cute way to make a tiered tray out of a couple of different sized plates and a candlestick.  They were very cute.


Two of these made with clearance plates from Walmart and candlesticks from Goodwill, total for two of them under $20

Another neat trick that a friend shared was that I bought cake pops from Spirited Sweets, wonderful woman who owns it.  With some Dollar Store buckets, a little paint and tissue paper, she helped me to make centerpieces that included a little something sweet for the kids to take home...ok some adults too.


They aren't just cute, they're yummy too!

I have a Sam's club membership and a friend has a Costco membership.  I went to both of those and to GFS as well to check for the best prices.  I kept everything clear (serving dishes, plates, plastic ware, etc.)  It made it easier to buy things where I found them cheapest.

The sandwiches I served were a huge hit.  I hate to even tell people that they are called "Funeral Sandwiches" but that is their name.  The recipe is here.  Instead of using deli ham which at the time was $5 something a pound here, I found whole ham on sale for $.99 per pound and cut it thin.  I found Jarlsberg cheese on sale at Costco...it didn't hurt that it was my favorite swiss!  LOL.  But instead of buying it in slices, I bought a hunk of it and ran it through the shredder on my Kitchenaid mixer and saved a ton of money.  It uses less this way too.

We had cupcakes and cheese cake bites so we threw in some fruit kabobs to counteract all that sugar.  It was fun a day or so before the event for friends to get together and we prepped all the fruit so that the morning of the event, we simply had to have them put on the wooden skewers.  

All in all, we had a wonderful reception.  Loads of food.  Lots of friends.  An absolutely beautiful day.  We couldn't have asked for anything better.  And it was all done on a very strict budget.  It can be done.