Saturday, May 17, 2014

2014 Container Garden

I know I've mentioned a couple of times that I have to change how I garden and my garden layout to make it easier on me.  I don't want to sound like I'm harping on this but I really do want to help others (and myself) to understand that just because I can't garden the traditional way doesn't mean I can't garden.  And it doesn't have to cost a small fortune to do it either.  You just have to improvise.

It's rained here for days so we've not been able to get the final tilling done in the garden in order to be ready to plant.  If the weather man is correct, we are going to have some nice days in order to dry out a bit and get that done.  I am hoping that I can plant by Tuesday or Wednesday.  We got out to my favorite plant farm, Cox's Plant Farm to get my plants and seeds, so I am ready.  I just need the weather to cooperate!

I used to have gladiolas planted on either side of my back deck steps.  A wonderful neighbor gave me some bulbs as he thinned his, assuring me I couldn't kill them.  What do you know?  He was right...LOL  As pretty as they are, I pulled up the ones on one side of the steps so that I could put in some containers for some veggies.  I put them on the far side so that they are less noticeable since I didn't go buy all new, matchy-matchy pots for my veggies.  I used stuff I could find around here.  

I started with some old toy totes we had in the back yard from when the kids were little.


This old green tote is 3 steps high compared to my deck steps, I put a mix of compost and some sand in it and that little bit of green you see are carrots coming up.


This old purple tote is just slightly smaller than the green one, in it is just compost and those dots in it are onions sets.
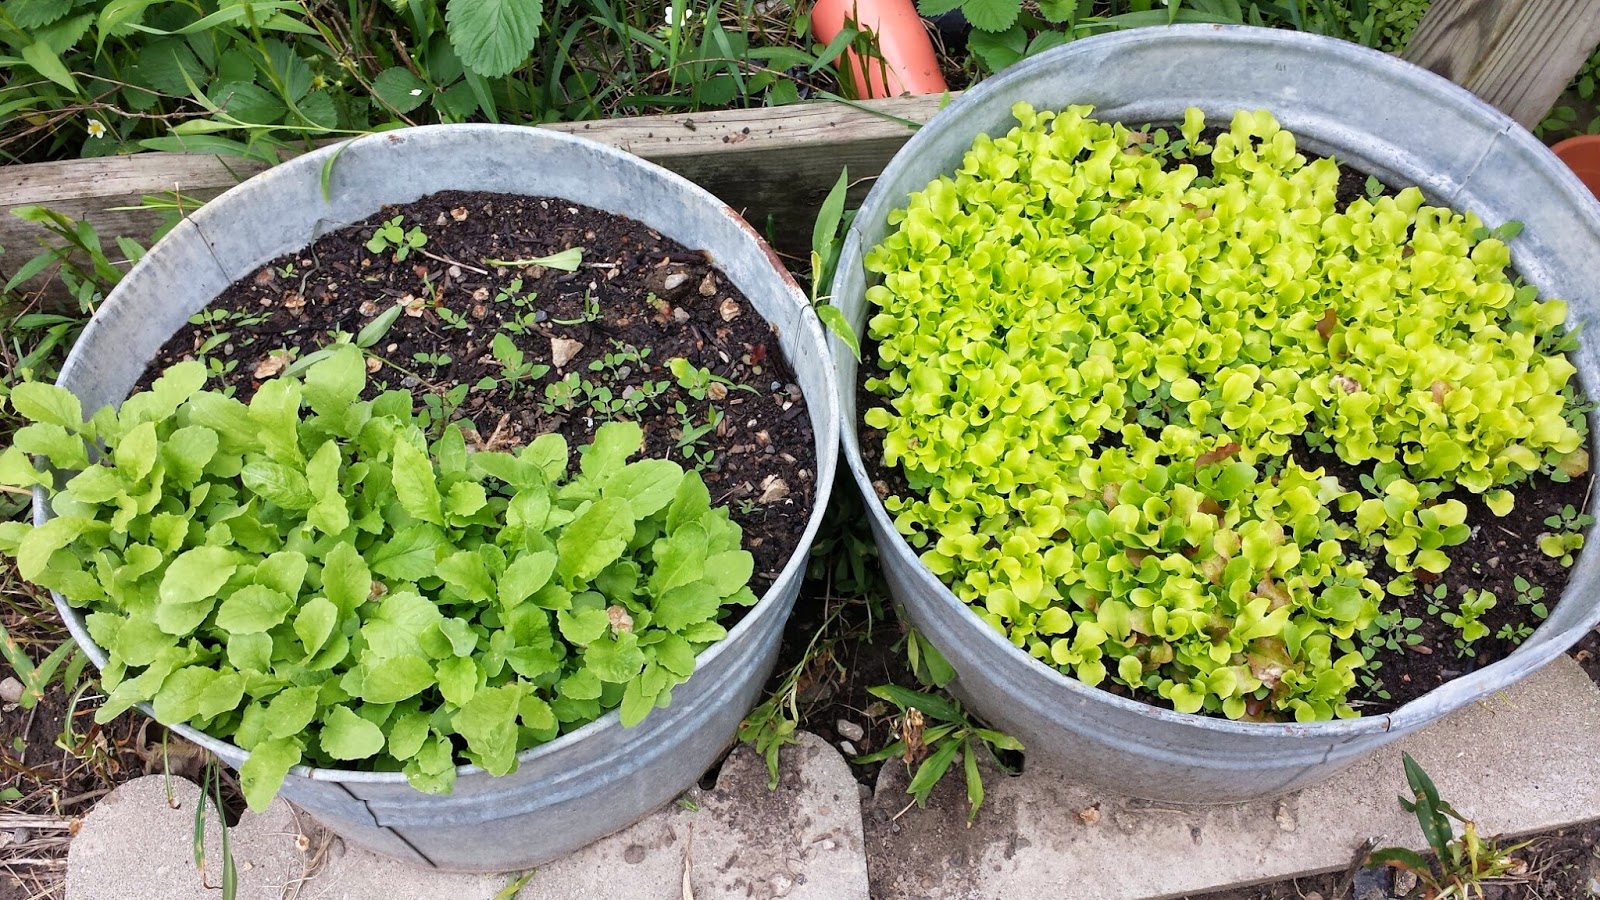

These two old metal wash tubs were formally used in an attempt to have flowers out front.  It was an unsuccessful attempt...LOL.  Now, the one on the left has Spinach int he back (it's not up yet) and radishes in the front.  Yes, I know, they need thinned, I'll get to it.  In the bucket on the right is leaf Lettuce.  Currently, it is about 1 1/2" tall and looking good.  I generally plant Mesclun lettuce but I was using up seed packets and this is still a yummy mix of leaf lettuce.  I can't remember the name but I like it because you can cut it with scissors before dinner and it will continue to regrow where you cut it.  An almost endless supply of lettuce!

I have also re-purposed several old flower pots in order to grow some herbs.


As you can see from my terrible attempt at labeling the inside of the pots after they were planted, these two pots hold Dill and Basil.  Dill is usually better planted in the ground but we're gonna give it a try in a pot anyway.


More flower pots of herbs.  The big green one is Parsley, the little green one is Oregano.  The bigger white one is Chives and the smaller white one is Thyme.  Thyme is new for me to grow so we'll see how it goes.  Around here, everything is an experiment!

The herb pots are on my deck on either side of the steps.  I did this so that they are waist high for me to weed or harvest and if I am having a really bad day, I can sit on the steps to do it.  The other pots with the other veggies in them are tall enough that it should be easy to tend too.  And again, if I'm having a bad day, a small stool sat next to the pots will allow me to tend to those easily.  It's all about adapting to what I need.  

I won't be able to grow as much produce as I normally have in the past but any fresh produce is great produce.  And it is that much less that I am buying.  All of the seeds and the onion sets used in the buckets pictured costs less than $10.00.  The compost was from the compost pile I had to move when we had to move a fence section...so it was free.  The amount of lettuce alone that I will harvest from these pots would have cost more than what I paid for all the seeds/sets.  And I will still be able to put up a lot of the herbs and some veggies to be used throughout the year.

I have the plan on how I will put out the other plants and seeds in order to be more manageable for me.  I will share pictures of that as I get it planted.  


Wednesday, May 14, 2014

Reception!

I know it's been a couple of weeks since I've chatted, well here anyway!  Lots of crazy things going on.  It was the end of the semester for me.  The end of my husband's first semester of teaching at the local college.  Of course, as with anyone with children there are spring sports, spring concerts, proms, etc.  Thank the Lord that the cold, snowiness of winter finally broke and Spring truly is here now.

For us, the big Spring event is usually the garden.  I've alluded to the fact that we're changing how the garden is being done to make it easier for me to handle it with my health.  We usually get it all in on Mother's day but that is on hold for a week or so.

This Mother's day my husband graduated from Purdue University.  I can't begin to tell you how proud I am of him.  In addition to the actual commencement ceremony that was held on Mother's Day itself, we put on a reception for him.  I say "we" because I had a lot of help.  Our Village really stepped up.  Yes I believe that our village includes more than just those helping with kids, our village may not be related to us by blood but they are, more often than not, more of a family to us than our blood family.  And we have an awesome village!

I rented the small water front pavilion at the White River State Park.  I highly suggest if you get the chance to go check out this park that you do so, it's free and gorgeous and right in the middle of downtown.  It is centered between the Eitlejorg Museum, the Indiana State Museum, NCAA Hall of Fame, Military Park, the Indianapolis Zoo, the White River Gardens, and Victory Field Ball Park.  The Convention center and Lucas Oil Stadium are within walking distance too!  It's really beautiful.


This is just a view of one side of the pavilion.


This is one of the lower conversational areas
I do have to say that these pictures were taken before the Spring clean up and flower planting was done.


A beautiful view of the city


This is a view from the old US 40 bridge that shows the greenhouse behind the pavilion and there were gardens there too.  Beautiful.

When you plan an event, don't be afraid to do the work yourself and include your village.  Just be sure that you are giving to your village as much as you lean on them, it is a two way street here.  As to the hardware, I had a couple of banquet tables for the food.  From friends, I borrowed a couple of steam tables, glass drink dispensers, and some serving trays.  On Pinterest, I found a cute way to make a tiered tray out of a couple of different sized plates and a candlestick.  They were very cute.


Two of these made with clearance plates from Walmart and candlesticks from Goodwill, total for two of them under $20

Another neat trick that a friend shared was that I bought cake pops from Spirited Sweets, wonderful woman who owns it.  With some Dollar Store buckets, a little paint and tissue paper, she helped me to make centerpieces that included a little something sweet for the kids to take home...ok some adults too.


They aren't just cute, they're yummy too!

I have a Sam's club membership and a friend has a Costco membership.  I went to both of those and to GFS as well to check for the best prices.  I kept everything clear (serving dishes, plates, plastic ware, etc.)  It made it easier to buy things where I found them cheapest.

The sandwiches I served were a huge hit.  I hate to even tell people that they are called "Funeral Sandwiches" but that is their name.  The recipe is here.  Instead of using deli ham which at the time was $5 something a pound here, I found whole ham on sale for $.99 per pound and cut it thin.  I found Jarlsberg cheese on sale at Costco...it didn't hurt that it was my favorite swiss!  LOL.  But instead of buying it in slices, I bought a hunk of it and ran it through the shredder on my Kitchenaid mixer and saved a ton of money.  It uses less this way too.

We had cupcakes and cheese cake bites so we threw in some fruit kabobs to counteract all that sugar.  It was fun a day or so before the event for friends to get together and we prepped all the fruit so that the morning of the event, we simply had to have them put on the wooden skewers.  

All in all, we had a wonderful reception.  Loads of food.  Lots of friends.  An absolutely beautiful day.  We couldn't have asked for anything better.  And it was all done on a very strict budget.  It can be done.  


Sunday, April 27, 2014

Camping

Hi all!  It's been a day or two since I've been here.  It's that dreaded end of semester time.  Papers due, presentations due, final exams....2 more weeks.  Just two more weeks!  I can do this!  LOL

We've always loved camping.  Not only is it cheaper to rent a camp site (or even a cabin) than it is to rent a hotel room, etc.  It's also so nice to be out in nature.  To wake to hearing the birds chirping, to hike in the woods and explore.  It's just wonderful.  As with my gardening, I'm having to adjust how we camp due my health so tent camping is out for me now.  We've gotten a camper but a lot of things will cross over between the two.  More on that later.

I've also been planning a camp out for my son's Cub Scout troop at the end of May.  It's a crazy time to be volunteering to do this but it's for the kids.  I was a Girl Scout leader for a number of years so you'd think it would be just as easy to plan but the two different scouting organizations have very different rules.  It's still do-able.

Regardless of rules, some things are universal for camping.  

I always have a handwash station at camp.  It sure does save time running back and forth to the bathroom.  It involves a milk jug, pantyhose, golf tee and rope.  This guy has an awesome demonstration on building one like I use.  The only thing different is that I add a golf towel to the rope that hangs it from the tree.  A golf towel because it has the grommet in the corner to allow me to string a rope through it.  Here is the video of making one.

Another thing I do is make my own fire starters.  One way is to use cardboard egg cartons and fill them with dryer lint.  I generally just put the egg carton on my dryer and each time I empty the lint, I put it in one of the egg cups.  Once all of the cups are full, I melt some old candles (or any wax) and pour over the top.  This is just strictly to keep the lint from falling out of the egg carton.  Once the wax is cooled, you can simply cut the cups apart (discard the top) and one or two of the egg cups is all you need to start a fire.  You can light the cardboard cup itself to start the fire.


Another fire started for times when space is limited (like backpacking) is to take a cotton ball and really stretch it out some, put Vaseline (or any petroleum jelly) on it.  Really work it into the cotton, coat it well.  Drop the cotton balls into a small Ziploc type baggie and you're good to go.

Shoot, in a pinch, my son learned at camp last year that you can start a fire with Doritos.  Who knew?

A couple of things that I insist on with little kids is swim shoes for around camp...they're hard soled and easy for kids to put on/take off.  And they don't feel as restrictive as tennis shoes.  Kids don't fight as much on leaving swim shoes on.  And they're easy to wash.  The other thing is flip flops.  These are for the shower.  I don't even wanna think about what might be on those shower floors!  Kids wear flip flops in the shower.  No exceptions!  They are NEVER to be worn other than in the shower though.  There are too many things that can stab their feet if they wear them anywhere else.

If you're camping with little kids, I skip the showers entirely.  I used a tub that I brought things to camp with to fill with water and gave the little ones a bath right there at the campsite.  It's pretty easy.  Another  side  use is that this tub is the tub I used for washing dishes too.  Everything that goes to camp has to serve more than one purpose for me to pack it, load it, haul it, etc.

I'll have more on camping later.  And my journey into switching from tent camping to rv'ing.  I love taking my kids camping, they learn something new every time.  And like a friend just said to me today about taking her kids camping "I'm gonna make outdoors kids out of them!"  It's a good thing too, I've always said "Kids need dirt and sunshine to grow!"  

I hope you're having a great weekend!

Monday, April 14, 2014

How to brighten a gloomy day?

The last few days here in Indy have been beautiful.  Sunny, upper 70's, lower 80's temps...just a gorgeous few days.  Monday brought thunderstorms and rain...and more rain.  And tonight is to be in the 20's and possibly snow.  As quickly as the wonderful weather brought good moods, Indiana's ability to change so drastically can sap that mood just as quickly.

Then the mailman came.  And this made the day her MUCH less gloomy!


What rain?  LOL

I'll be perusing my favorite plant catalog today!  Let the garden planning begin in earnest!

Have a wonderful Monday!

Sunday, April 6, 2014

Improvising

I often say that I may not be good at a lot of things, but I can improvise with the best of them!  Sometimes you just have to think outside the box for solutions.

The other evening, while in the midst of working on homework, my husband tells me that a beloved employee at his work was coming back after being off for a bit.  And could I bake something?  Cupcakes are easy to send to work as you don't need silverware and plates to eat them.  

I needed to get them done quickly if I was going to get them iced at a decent time.  I only had one cupcake pan.  Time to improvise...

Instead of using the cupcake pan, I used a sheet pan, canning jar rings and cupcake liners to get this:


This really does work!

Before baking:


After baking:


I was able to make 23 cupcakes (who really gets 24 out of a batch anyway?) in one round in the oven. 

Here's another quick hint to improvise...Those pricey cake mixes that are "Funfetti"...make your own!  I just add some cookie sprinkles to the cake batter.  Make sure you're going to bake them pretty quickly afterwards or the cookie sprinkles will start to "bleed" their color through the batter.  I usually just add them in immediately before putting the batter in the liners.

Make a quick powder sugar frosting with some strawberry flavoring and you're good to go!


These were the ones that the hubby took to work.  I kept a few out and iced 4 for the kids.  We don't eat a lot of cake type things.  The cupcakes that were left, I did not ice.  I put them into a Ziploc and froze them.  Then in the future when someone has a craving for a cupcake, you just pop them out of the freezer and being cupcakes, they thaw pretty quickly.  Just ice and you impress the kids (or hubby) and you didn't even have to bake!  LOL

Enjoy!

Tuesday, March 18, 2014

Celebrations!

Since this is my 100th blog entry, I thought I'd talk about celebrations, more specifically, the food we serve.  Just because you have a get-together doesn't mean you have to break the bank to do it.  You just have to get creative.

I play Bunco with a wonderful group of ladies once a month.  This month was my first time to host and cook for them.  I love this type of stuff!  I'll post the pictures first and then explain what I did.


Just to label things first, in the upper picture starting from the upper left and working around like a clock.  There are three types of cookies in that bowl, the next bowl is a bacon/tomato/ranch pasta salad then on the tray are spinach/artichoke cups and taco cups, then a plate of crackers and some bacon cheese dip.  

In the bottom picture is a chicken cordon blue casserole, on the plates are mousse cups with homemade whipped cream and the others are cups of sour cream, guacamole, the chopped tomatoes & shredded lettuce are not shown.

The Chicken Cordon Blue casserole was really easy to make.  The recipe is here.  I used some of the Magic Chicken to make this.  It was really easy to put together a head of time and just wait to put the cracker crumbs on top just before baking.

The taco cups were interesting.  I took a biscuit cutter and cut rounds out of tortillas, then I pushed them down inside mini muffin tins and bake them for about ten minutes on 350 degrees.  This makes them crispy like hard taco shells.  I then made regular taco meat, adding a can of drained black beans to it.  When time to put it all together, I put a scant teaspoon of queso dip in the bottom of the cup, followed with a tablespoon or so of the taco meat.  Top with some shredded cheese.  They bake just long enough to make sure they're melted through and the cheese is melty.  I served them with guacamole, sour cream, taco sauce and shredded lettuce and chopped tomatoes to put on top.

The Spinach Artichoke cups were amazingly similar.  I used Wonton wrappers and put them in the mini muffin cups the same way I did with the taco cups.  I spritzed them with Pam before baking.  Here is the recipe for them.  I prepped the shells ahead of time and prepped the stuffing early.  Just before time to serve, I used a small ice cream scoop to put the dip into the wonton cups and then baked them until warmed through.

The bacon cheese dip was the favorite of the night.  I have to admit, it was good even after it cooled off and eaten with a fork.  This would be one of those dips that would be much better served in one of those cute, little crock pots so that it stayed warm.  I did add a couple of more pieces of bacon into the recipe than it called for...I like bacon!  It was great served on crackers.

The mousse cups I initially tried to make were a failure.  It happens.  Plan B was those little Athens Tart cups made of Phillo dough.  They worked great in a pinch.  I made a boxed mousse, cheap and easy.  I put it in a Ziploc bag, cut off the corner and filled the tart cups.  Then I made homemade whipped cream in just a few minutes and spooned it on top.  Nothing fancy but quite yummy.

The pasta salad is something I played around with over the summer and there really isn't a recipe.  I boiled some bow tie pasta, drained & rinsed it.  About 3 cups total.  I mixed 1/2 cup mayo with a pack of ranch powder mix and about 3 tablespoons of milk.  I added half a dozen pieces of chopped up cooked bacon, a handful of chopped grape tomatoes, a teaspoon of garlic salt and a cup of shredded cheese.  You can make this ahead of time and if it gets a bit dry, you can add a few tablespoons of milk to it to moisten it back up.

Nothing was fancy or overly pricey but it was yummy and fun.  I wanted to have something that people could eat as their dinner and also have the options of some finger foods that could be eaten while we were playing Bunco.

When you have a party, reception, get-together or what have you, you can make some easy quick things to eat that are fun and won't break the bank!

Thursday, March 13, 2014

Cheap Eats

Hello everyone!  If this winter isn't bad enough yesterday, here in Indy, it was 68 degrees, sunny and beautiful out.  This morning is was like 20 degrees and snowing and sleeting and raining...I wouldn't have been surprised to look out the window and see locusts.  Before you think I'm just whining about snow, I grew up in Pennsylvania, right on Lake Erie so, snow isn't exactly a new thing.  Only in Pennsylvania when the snow starts, it stays until Spring.  This back and forth stuff here of mid 40's-high 60's for a day or two and then plunged back into the sub-zero temps and snow is just crazy.  It's no wonder everyone is sick!

Enough about the freaky Indiana weather!

Being someone who is always looking for ways to reduce the food budget as well as someone who likes to experiment with new ingredients...which can sometimes be quite expensive.  They can also be things that I want to try but am leery of paying a premium for things that my family may not like.  We all know how finicky kids can be...husbands too sometimes!  LOL

A few months ago, someone suggested a place called Angelo's.  It's not a grocery like Kroger or Marsh.  They buy things that are damaged, dented, close to date, or a store is discontinuing the item.  There is no set inventory.  They stock whatever they get that week.  

I generally do one big shop a month and have a follow up shop later in the month for fresh produce and milk.  Ok, let's be honest, if my husband or I get near a store that sells milk, we're stopping to get some.  This family goes through so much milk, we should own a cow!  Anyway, I have started to run by Angelo's before my once a month big shopping trip.  I find some really neat things in there.  

Like I said, you NEVER know what you'll find in there...here's a sample:  


Specialty oils

Vegan items

LOTS of marinades & sauces

Noodles of all kinds, standard and ethnic varieties

Everything from gravy mix to Thai quick meals

More Ethnic items

They even have gallon cans of sauces & other items

Many different juices & waters

Even cleaners and soaps

Ok...distracted by Truffles...walk away from the Truffles....LOL

They even have automotive items and some over the counter medicines

They have some freezer items too.  Breaded chicken and such

I missed getting a picture of the dairy compartment...must have been when I was sidetracked by the Truffles!  I will have you know though that as a diabetic, I walked away from the Truffles.  It was hard, but I did it!  LOL

I did pick up a few things though.


I got 8 bags of caramel Bugles, a bag of dog food, a bag of croutons, 2 bags of Quaker Popped snacks, a box of Bisquick, a tub of caramel dip for apples, a 2 pound tub of Land O Lakes, a jar of olives, a box of chocolate Mousse, a packet of icing flavoring and a couple of Saute Express packets.  The Bugles alone sell for about $1.69-$1.89 to buy them retail.  Everything I purchased was in date and with the exception of the top of the Bisquick box, all packaging was undamaged.  I don't normally buy Bisquick mix but my teen will make pancakes with a mix but not with a cookbook...I don't understand her at all!  LOL.  I purchased everything in that picture for $22.12.

Angelo's is considered a food salvage store.  I don't care for that term, because I didn't find anything that I'd call trash that was salvaged.  Whatever they call it, I'm not mad to have found a place to get food at a discounted price.

If you get the chance, check out Angelo's!  They're at 201 S. College Avenue in Indianapolis.  If you're not in Indy, check out your phone listings for Food Salvage stores.  Check it out, it may not be your cup of tea (which Angelo's had a nice selection of by the way...LOL) but if you don't go, you won't know.  Happy hunting!

Just as a side note...I think it's just wrong that I left there with dog food and not those Truffles!