Today was one of those absolutely beautiful Fall days. The weather was cool but not cold. There wasn't much wind and the sky didn't have a cloud in it as far as you could see. It was crisp, clear and gorgeous out! And we got to go to Brown County! (for those not from Indiana, check out this site)
We had family pictures taken today by my very dear friend, Sarah of Lillybug Photography. She always picks a different cabin in Brown County and she does Fall pictures there. We love getting to go to the country, the Fall foliage there is breathtaking! We walk around the woods around the cabin to find the best spots for pictures. There is nothing better than a nice relaxing walk in the country. We also always make a stop in Nashville, Indiana as well. It has such quaint little shops and it's just a nice afternoon. We were outdoors in the beautiful country. Ahhhh.
Apples. I was going to write about apples. Apples mean apple crisp, apple pie filling and best of all, Apple Butter! It seems like every waking moment not filled with school, kids sports or Scouts has been peeling apples. I did get a wonderful peeling/coring machine from another friend that has been great, but, I'm a little picky and still take a paring knife to "clean up" any missed peels, seeds pockets, and whatnot.
Yesterday, I peeled and cored about 30 pounds of apples to prep for apple butter. I make mine in the crock pot and it takes about 18-20 hours on low for that quantity. So after peeling and cutting all those apples, my hands are trashed. I have so many nicks and cuts it's not funny. I really whined about that after I did the apples when I cleared all the peppers out of the garden for the year and was cutting, dicing and de-seeding JALAPENO peppers. Oh Lord, that stung...LOL.
Back to apples. I rough chopped the apples and split them between multiple crock pots to cook. I try to keep it fairly simple, apples, brown sugar and spices (cinnamon, cloves, allspice, ginger and nutmeg) and let the the crock pots do the work. Once the apple butter is reduced and thickened I put it in sterilized jars and process them in a water bath canner.
After feeling crappy about my hands stinging all day, I was kinda focusing on that as hubby drove us home...LOL. Anyway, when we got home and walked in the house, oh the smell. That wonderful smell of fresh, warm apple butter filled the entire house. Oh, it was so yummy! My husband even tried to convince me to fry some biscuits for him. I told him no, he could wait. Besides, I didn't have room to drag out the deep fryer when I had all the crock pots and the canning stuff out all over my tiny kitchen. Don't worry, I'll make him some fried biscuits and apple butter this weekend!
So all in all, this weekend was an overall success. Family pictures, a day in the country, apple crisp, homework done and several dozen jars of apple butter! Woohoo!
Showing posts with label Canning. Show all posts
Showing posts with label Canning. Show all posts
Monday, October 21, 2013
Thursday, October 3, 2013
Onions, Carrots and Leeks! Oh my!
Since rain is predicted, by the weatherman AND my asthma, the family helped me last night to harvest the onions, carrots and leeks. Today I am working on getting them put up.
Onions are pretty easy in that I just wash them, chop them up and freeze them. Yes, there are tears. Lots of them. But I chop them all at once and it's done. Once they're chopped, I put them in a Ziploc bag, not too many in each bag. I like to get as much as out as possible and flatten the bag out. I don't like the bag to be more than 3/4" thick this way because onions clump when the freeze, no way around it that I have found yet. But by keeping the bag thin, it's pretty easy to break them up frozen to use just want I need. That way, I don't have to use a ton of bag to freeze small amounts but I can still get out what I need without having to thaw them. I've also been known to take the smooth side of my meat mallet and taking a few frustrations out on my bag of frozen onions...LOL.
The carrots are easy too. I clean and slice them all. I take the ends and pieces that aren't uniform in size and put those aside, we'll talk about those later. The ones that are somewhat uniform, I will blanch and shock those like I do corn, you can find that blog post here. I lay them out on a clean towel to dry and then on a wax paper lined cookie sheet to freeze them like I talked about int he blog post on berries here. Once frozen, put them in Ziplocs and back in the freezer. This will let you pull out just what carrots you need without having to thaw them all.
I haven't forgotten those ends and pieces. I trim the carrots up nicely before I slice them but these odd pieces, I just put straight into a Ziploc back and into the freezer. These are the pieces that I pull out when I am making stock and broth. I do the same thing with Celery bottoms and leaves and the onion ends. It's like free flavor into your soups and stocks. I'd rather put them in broth than in the trash!
Leeks are new for me this year. They grew very well in the garden this year. I had to research how to deal with these but it was pretty easy. They also go into the freezer. I sliced the root end off and then sliced them up almost to the leafy part. I put the slices in a LARGE amount of cold water, kind of separating the slices a bit. Don't worry about getting them all, it will be ok. I took the upper parts (not all of it but maybe 2" above my slices) and cut them in half lengthwise and soak them in a sink of water. You soak them to get let the dirt between the layers to fall off. Once they've soaked, I put them in a colander to drain and then in Ziplocs. These pieces I use for stocks and broths. The slices I put on towels to dry and then in Ziplocs once dry.
Remember to label and date the Ziplocs! You'll have them to use all year!
Monday, July 22, 2013
Jam
Back in late winter, when it was so cold out but the sunshine was teasing us into thinking spring was near, I talked a bit about jam. I love making jam. I always think fruit is more fun than vegetables. As a child you always heard, "eat your vegetables, they're good for you" while you were sitting behind a plate of some veggie that you didn't really like (or thought you didn't like). Whereas, when we wanted a snack, instead of candy or pudding, we were given fruit. So fruit always stuck as being "fun".
When I make jam, I think I am taking that fun to another level. There is so much you can do with jam, and it's all yummy. And I make a lot of it. A friend told me that she thought I made it all at once when the fruit is in season and for the most part I do.
When I get berries especially, I don't always have time to process them all at once. Here is a great trick that you can use even if you find a really great sale at the grocery or farmer's market. I found some restaurant style sheet pans on Amazon really cheap, but you can just use your cookie sheet. I line them with wax paper and I spread the unwashed berries on the wax paper in a single layer. It's important to wash them before you use them and not before you freeze them because they can get mushy as they thaw if they're washed first. I put the trays in the freezer until the berries are frozen and then transfer them to good Ziploc freezer bags. Here's how they look frozen:
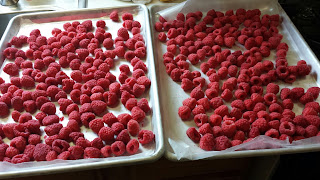
This lets me get the most fruit when it is in season and use it as I have time.
Making jam is easy. It is simply a matter of mixing fruit and pectin and bring that to a boil. When it is boiling you dump in sugar, usually a LOT of sugar when it comes back to a boil, you boil it for a couple of minutes. That's all there is to making it. Each fruit takes a little different amount of sugar, so I'm not giving weights or measurements of fruit or sugar. Generally, your pectin will have instructions in it for simple fruit jams.
To can the jam, you simply ladle it into hot canning jars then wipe the rims with a clean damp cloth. This is important because when you put the lid and ring on it, you won't get a seal if the rim has any fruit on it and your jam will spoil. Once you're sure the rim is clean, put on the lid (that has been waiting in a bowl of warm water to pre-soften the sealing material) and put on the ring. Don't over tighten the ring or you can ruin the seal. The jars will need to process through a water bath canner. All this really is is a large pot, mine is enamel coated, that has a rack of some sort in the bottom so the jars aren't sitting directly on the bottom of the pot (so they don't break) and is deep enough for there to be enough water to cover the jars by 1". You boil the water in the canner for 10 minutes and then set the jars out to cool. Don't fool with them until they're cool. You'll hear the popping and tinking of the lids making the seal. It's a wonderful sound.
By putting the fruit in the freezer until I can get it all processed into jam, I'm able to make a bunch at once too. Don't mind my dog photo bombing the picture!

Jam is also for more than just biscuits and toast or peanut butter and jam sandwiches. My kids will put a spoon of it in oatmeal or grits or cream of wheat. It makes a great pancake or waffle topping. My husband love to melt a little bit in the microwave (it doesn't take long) and uses it as ice cream topping. I have found many recipes for bbq sauce using blackberry jam.
Jam is fun, but don't forget to eat your veggies too. They're good for you!
Wednesday, July 17, 2013
Corn
This is the time of year that I look forward too and dread both! The garden is producing very nicely at the moment and will continue to do so for a while yet. This means that I am and VERY busy! LOL.
Last night we did our second picking on the green beans and got about 13 pounds. If canning those isn't enough to do, my husband came home with some fresh corn.
I don't grow corn. It takes up a lot of room in the garden and the yield isn't large enough to warrant giving up that much real estate in the garden for it, so I buy it. I generally buy a bushel or so off of a farmer who has a little roadside stand west of Indianapolis, he's been out there for years.
The difference in handling the green beans is a personal preference for me. I don't like to can corn. I don't like how it tastes. In my opinion, corn is better frozen. It's pretty easy to do, too!
In my family, the kids get to shuck the corn. I remember being little and it being fun to do but then it got to where my twin and I were just waiting on our little brother to get big enough so HE could do it...LOL. I am happy to say that I have continued that tradition and the kids shuck corn. Yea, I'm a mean Mom sometimes.
Anyway, once your kids have shucked the corn, the blanch and shock method is a pretty easy process to get it ready to go into the freezer. You'll need good Ziploc freezer bags, Ice and a pan (with lid) big enough to put corn on the cob in and a clean towel. I prefer a steamer because I think when you boil veggies in water, most of the good stuff (vitamins and minerals) in them stays in the water. Even if you just go get a collapsible steamer basket and use your big soup pot, steaming is still better.
You'll need to fill the sink up with cold water and add ice, the process here is that once you've steamed the corn, the ice water stops the cooking process. I lay out the towel on the kitchen table, I'll explain why in a bit. The pot, if you're using a steamer, only needs 1" of water in it. If you're not using the steamer basket, fill the pot with water and bring to a boil.
Put the corn, whether or not the steamer basket is used, in the pan of boiling water, a few ears at a time. Put the lid on and let it boil for 3 minutes. When the time is up, put the corn into the ice water. for 3 minutes. When that 3 minutes is up, place the corn on the clean towel.
I put the corn on the clean towel to dry. If the corn is really dry when you put it in the freezer, it will have less of a chance to get ice crystals on it and will help for the corn that you put up off the cob.
See how easy it was to blanch and shock the corn? Now you're ready to prep it for the freezer.
For Corn on the cob, just put a few ears into good Ziploc freezer bags. Don't over fill the bags. I like to keep it at 5-6 ears per bag so that the bags will lay flat in the freezer and I can stack them. Try to get as much air out of the bag as you're sealing it. Once they're bagged, they can go in the freezer.
There is no need to thaw the corn on the cob when cooking it. Just put the corn into a pan of cold water, cover it. Put it on medium heat until it comes to a boil. Let it boil for about 5 minutes and you're good to go.
For Corn NOT on the cob, there are all sorts of gadgets and gizmos to remove corn from the cob. I'm guilty of buying one or two of them. You know what I use? A thin paring knife. You know those little cheapy ones you're given when a store has a "Come to aisle 15 and hear a guy try to sell you the latest Ginzu knife and you'll get a free gift" promo. Yes, that is what I use.
Once the corn is dry, I use our popcorn bowl and place the stalk end in the bottom of the bowl and use my small paring knife to gently cut the corn off the cob. It's a pretty quick process and you just move on to the next ear. You'll need to move the corn to a different bowl so that you aren't trying to cut corn off the cob while it's in 3" of corn kernels. Once you have all the corn off the cob, just put it in good Ziploc freezer bags. You do have a choice here, you can put it in one gallon Ziplocs and just remove what you want for each meal but this will require you to be diligent in making sure the bag is sealed well with as much air out of it as possible when you put it back in the freezer. Or, you can put it in meal size portions in quart-size Ziploc bags. Again, try not to overfill the bags so that you can make them flat and stack them in the freezer. **NOTE-once you cut corn off the cob, it will not be dry and you do not want to lay it out to dry. Once you cut if off the cob, it needs to go into a bag.
If you don't get corn by the bushel, you can do the same thing with corn from the grocery or produce stand if you get a good quality corn in season. The key here is good quality. If you put sub-standard produce in the freezer, it will NOT get any better. Keep that in mind.
Even if you're not up for trying to can anything yet, freezing is pretty easy to do and if done correctly, you'll have a product that comes out of the freezer just as good as the day it went in!
Monday, July 8, 2013
Green Beans!
It's that time of year! The garden is starting to come in. The early stuff that I don't put up, the things we just eat straight from the garden, has come in beautifully. We've been eating lots of fresh lettuce, spinach, radishes and cucumbers. I have tons of good size tomatoes but none are red yet. My son is just waiting on cucumbers and tomatoes mixed with vinegar and water. We plant a grape tomato plant just for him because he likes to grab a few while he's outside playing.
Over the weekend, in the sprinkling rain, we got our first picking of green beans. I plant Blue Lake Bush Beans and if you are careful in picking the ripe beans, you can get a second picking off the plant. Our first picking yielded 12 pounds of green beans. It was time to can them!
Green beans are one of the more time consuming things to can, in my humble opinion. I wash them after I pick them and again after they're snapped. There always seems to be crud on them if I don't do the two washes. My husband and I sat and snapped the ends off and snapped them into bite sized pieces. I know some people cut them but we grew up watching our Moms and Gram snap them, so that is what we do.
After snapping, I cold pack them. That means I don't get the beans hot before I can them, I pack the washed beans into hot jars and then cover in boiling water. Some people add salt for flavor, due to health reasons, I don't do this. Besides we don't need extra salt in our diet! After putting the lids and rings on, they go in the pressure canner. I know way back when, people would can them in a boiling water (water bath) canner and boil them for 7 hours or more. THIS IS NOT SAFE! Botulism is nothing to mess with. I'm sure there are older generations who will say they've done this for years. In reality, they've played Russian roulette with their health. Don't do that! Use a pressure canner!
I got my first nine jars ready to go, I only prepare what will fit in the canner at a time. I got it started and found that the gasket on my canner failed! My husband joked that it was only "30 years old". It's not that old, but he's not far off...LOL. As with most of my canning equipment, I got it used. It was almost brand new when I got it but it was used. So, all in all, 20 years is great for a gasket to last! Thankfully, a friend loaned me hers (Thanks again Tracy!) so I could process my beans.
I've heard so many people say they're afraid of pressure canners. They've heard horror stories of them blowing up. Way back when, there were accidents with them but the new ones have built in safety features that prevent that. There are pressure valves and safety locks. If the canner is under pressure, you can NOT open it. The best advice I can give you is to follow the instructions for the canner. Even if you buy a used one, you can Google the instructions. I do suggest that those new to canning start with things that you can process with the boiling water (water bath) method. You can move on to the pressure canner after you get the canning process down!
After loading the canner, bringing it to pressure and processing the required 20 minutes and repeating this process until I'd worked through all 12 pounds of beans, we have 30 jars of beans canned.
Why go through all this? Because there is nothing like opening a jar of green beans in the middle of Winter and them tasting like someone had just came in from the garden with them. They are THAT good!
 Now, come on sunshine! I need some tomatoes!
Over the weekend, in the sprinkling rain, we got our first picking of green beans. I plant Blue Lake Bush Beans and if you are careful in picking the ripe beans, you can get a second picking off the plant. Our first picking yielded 12 pounds of green beans. It was time to can them!
Green beans are one of the more time consuming things to can, in my humble opinion. I wash them after I pick them and again after they're snapped. There always seems to be crud on them if I don't do the two washes. My husband and I sat and snapped the ends off and snapped them into bite sized pieces. I know some people cut them but we grew up watching our Moms and Gram snap them, so that is what we do.
After snapping, I cold pack them. That means I don't get the beans hot before I can them, I pack the washed beans into hot jars and then cover in boiling water. Some people add salt for flavor, due to health reasons, I don't do this. Besides we don't need extra salt in our diet! After putting the lids and rings on, they go in the pressure canner. I know way back when, people would can them in a boiling water (water bath) canner and boil them for 7 hours or more. THIS IS NOT SAFE! Botulism is nothing to mess with. I'm sure there are older generations who will say they've done this for years. In reality, they've played Russian roulette with their health. Don't do that! Use a pressure canner!
I got my first nine jars ready to go, I only prepare what will fit in the canner at a time. I got it started and found that the gasket on my canner failed! My husband joked that it was only "30 years old". It's not that old, but he's not far off...LOL. As with most of my canning equipment, I got it used. It was almost brand new when I got it but it was used. So, all in all, 20 years is great for a gasket to last! Thankfully, a friend loaned me hers (Thanks again Tracy!) so I could process my beans.
I've heard so many people say they're afraid of pressure canners. They've heard horror stories of them blowing up. Way back when, there were accidents with them but the new ones have built in safety features that prevent that. There are pressure valves and safety locks. If the canner is under pressure, you can NOT open it. The best advice I can give you is to follow the instructions for the canner. Even if you buy a used one, you can Google the instructions. I do suggest that those new to canning start with things that you can process with the boiling water (water bath) method. You can move on to the pressure canner after you get the canning process down!
After loading the canner, bringing it to pressure and processing the required 20 minutes and repeating this process until I'd worked through all 12 pounds of beans, we have 30 jars of beans canned.
Why go through all this? Because there is nothing like opening a jar of green beans in the middle of Winter and them tasting like someone had just came in from the garden with them. They are THAT good!

Monday, June 17, 2013
Peaches!
We just returned from vacation last night. We took the kids to Disney and then on to St. Augustine, Florida. It was a great trip, the kids had so much fun. Even spending the "you're gonna learn something" day with Mom in the historic part of St. Augustine. The funny part of it is that they enjoyed it.
I was able to get some southern peaches to bring home to make jam with. The only downside when I did this last year was hand peeling all of those peaches. My friend, the chef, tells me this year that I can treat them like tomatoes and blanch and shock them to slip the skins off. Where, oh where was she last year? LOL.
For those that don't know what that means, if you take a paring knife and cut a little skin off the top and bottom and then dip the tomato (or peach) into boiling water for 2-3 minutes and then move it to sink full of ice water to stop the cooking process and let them sit there for 2-3 minutes. The skins should slip right off or need very minimal help in coming off.
That is how I am going to deal with the peaches this year. Then I'm making jam.
I know I could have gotten my peaches here but it's always better buying local because it is fresher. I eliminate the processing and shipping time by getting them myself while I was on vacation. Of course, this doesn't work when you're flying but we can't afford to fly so we drive...LOL.
That's also a great hint too, if you buy things in your area when they are in season, they are cheaper and fresher. There is almost always a way to "put up" the items that you get in season. So stock up while things are fresh and cheap!
If you haven't planted your own stuff, find a U-pick place and take the family and you can pick things pretty quickly working as a team! Enjoy the fruits and veggies that are fresh and in season now!
Tuesday, April 23, 2013
Freezing
Oftentimes, I sit trying to think of what to write on this blog. Then, just when I think I can't come up with something, a friend will ask about something and my proverbial light bulb comes on! I guess this means if you know me in real life, keep asking questions!
Today, my friend Amanda was asking me about freezing veggies. So, let's talk about freezing!
For most veggies, like corn, green beans, etc., that you choose to freeze if you're not one who thinks canning is for you. In fact, I prefer corn to be frozen, this is just my preference.
Prepping veggies for the freezer is really easy. It's blanching, shocking, drying, packaging and labeling.
Blanching can be done in water or steam. I have a large enameled pan with a steamer insert that I love. It's good size and without the insert, can be used as a smaller stock pot. I like to use the steaming method because I think that you leave the good vitamins and minerals behind in the boiling water. Whether water or steam, it is a matter of putting the veggies in the water or steam for a few minutes. Here is a guide that will give you some cook times for the different veggies.
Shocking is simply dumping the veggies into ice water to quickly stop the cooking process. If you are doing a lot of veggies, you will use a lot of ice. I seriously love my ice maker when I'm doing this! Generally, I leave the veggies in the ice bath for how ever many minutes they were in the hot water or steam.
For drying, I lay clean kitchen towels on my kitchen table and then as I remove the veggies from the ice bath, I lay them out on the towels and let them dry for a few minutes. This step will help to keep the veggies from becoming a vegetable brick in the freezer. They'll be more separated once frozen.
I use Ziploc freezer bags for packaging. I like them over containers because I can lay them flat. I put the veggies in the bag until it's full but not bulging, like I said, I like to lay them flat and stack them, it saves space. Try to get as much air out of the bag as you can and seal it.
Make sure you label them with what is in the bag and the date you put it in the freezer.
I do take a short cut when I am going to use a veggie for cooking such as onions, celery and carrots. I skip the blanching and shocking. This shortcut is for veggies that are cooked with only, like onions in meatloaf or carrots and celery for making stocks, etc. I will cut these veggies up in the way that I will be using them. I dice the onions, slice the celery and carrots and lay them out to dry just a bit and then just freeze them. If I have a lot of onions, I will lay them out on wax paper on a cookie sheet and put them in the freezer until they're frozen and then move them to the Ziploc bag. Also, the celery leaves are great for flavoring broths and stocks too. I will rough chop these and put in ice cube trays, fill with water and freeze them. Once frozen, pop them out and put in a Ziploc. When needed just pop a couple of cubes in the stock pot.
This is a great thing to know how to do because even if you don't garden, when you see a really great sale at the grocery or farmer's market, you can get a few extra items and put them up in the freezer to use when you can't get them as inexpensively.
Saturday, April 13, 2013
Gotta love Indiana weather!
A couple of days ago, it was 81, yesterday it was about 48. Today, it seems we had a hint of both of those days. My son had his first soccer game this morning and man was it cold and, of course, the wind kicked up about 15 minutes before the game started. For once, I wasn't upset that my family leaves all sorts of random stuff in my car because I found my husband's goose down coat in the trunk. Our Coach said I looked like Nanook of the North. Ok, at least I was warm! LOL.
This afternoon, the sun came out and it warmed up quite a bit. It turned out to be a pretty nice day. Cool but sunny and bright! Time for a little time outside!
In moving the blackberries and working to expand the strawberry bed, I find that I need more strawberries. And more compost. Hubby and I worked in the strawberry bed for a bit. I couldn't get as much as I wanted done because of the lateness of the day but we got a good start. We moved some of the strawberry plants to kinda fill in some space in the back. I also planted some strawberry roots that a friend (Thanks, Alisha) had left over from starting her own strawberry bed and gave to me.
Even though I compost, with expanding the strawberry bed, I need more than I have. Just as quick as I am done with finals (two weeks, I only have two weeks left!) we're going to bring in a load of compost to fill the new part of the bed. That is a great hint, when starting a new bed, I always start with compost instead of topsoil. It's much more nutrient rich and is like jump starting the plants without using store bought (chemical) fertilizer.
Working on the strawberries made me think about my canning stuff. I know I need to start stocking up on SureJell for my jams and jellies. Now is a great time to be on the look out for canning supplies. Yard Sales, Garage Sales, Tag Sales, whatever you call them in your area are a great place to buy things like Water Bath canners, Jars, and other odd supplies. I, personally, am on the look out for a new Water Bath canner. My giant one covered two burners and was, as my husband puts it, a hundred years old. It developed a leak. My replacement is smaller but still good size. I don't *need* a new one but I *want* a big one like I used to have. I think I will hit up some sales in the country.
Tuesday, March 19, 2013
Canning
I know it's not canning time. Yet. I generally tell anyone wanting to start canning that the very first thing they need to get is the "Ball Blue Book of Canning". This is just a thin paperback book that you can even buy at Walmart in the canning section, but it has the best, most trusted information. I want to add, I love old cookbooks, I even collect them. This is NOT a book that you want to use an old edition of.
So much has changed since our Grandmothers canned. Some of the ways that prior generations canned is now considered to be very dangerous. It's important to follow the instructions carefully as to what foods need a water bath canner (such as tomatoes) and what ones need a pressure canner (such as green beans). In Grandma's time, they'd boil green beans in a water bath canner for something like 7-8 hours. In a pressure canner, you can can them in a matter of minutes once the pressure comes up. Time isn't the only reason that you should use a pressure canner when it is called for. Low-acid foods should never be processed in a water bath canner, it simply can't get hot enough to be sure the food is free of anything botulism risk. Higher acid foods, or those that have had acid (citric acid or lemon juice for example) added are safe to can in the water bath canner. Here is a website that describes the acid contents!
While looking around on Pinterest, I found a really cool website from the Utah State University Cooperative Extension that has a self-guided canning class. You can find it here! This site also has some really cool excel calculation worksheets to figure the cost of either canning or freezing produce. Remember, if you are growing your own food to can or freeze to not forget to include the cost of the seeds or plants.
I also always suggest to people who are new to canning to stick with foods that require the water bath canner for the first year. It's not just because canning in a water bath canner is just a little more forgiving but, the equipment cost is far less as well.
Another thing to keep in mind is that you don't need brand new equipment. As long as the water bath canner doesn't have rust or a hole in it, you're good. Even if you buy a pressure canner, you can always order a new seal and weight. I, personally don't use a digital weight, I use the old-fashioned one that jiggles. Watch yard (garage, tag, whatever you call them where you live) sales, the Goodwill, Craigslist, auctions or estate sales for jars of all sizes. I also found a wonderful sale last year at Meijer that was amazing. Buy 2 cases of jars get one free! I'm waiting on that sale again as I will put the hurt on Meijer! I reuse most jars, I just buy new lids each year. I am always looking for jam jars though because, I sell the jam I make!
Sunday, March 3, 2013
Thoughts of Jam and Jelly
Good morning everyone! I am getting spring fever so badly lately it's not even funny. Even though it is cold, we are having some very nice sunny days. Too bad it's really cold out. Oh, and the weather man is predicting 6+ inches of snow one day this week. Boo!
This has brought my thinking to jam and jelly. In the past, I have always made the basics: strawberry jam, blueberry jam, blackberry jam, raspberry jam, cherry jam, peach jam, grape jelly and triple berry jam. The triple berry was an experiment as I had some blueberries, strawberries and blackberries left over from making their jams that instead of wasting them, I threw them in a pot together and made jam. I also make apple butter too. I found an amazing Amish recipe that I adapted to use in my crock pots, which is so much easier than stirring for hours on end.
Later, due to request of friends, I added jalapeno jelly to the mix. I had no idea it was NOT mouth-burningly hot. A friend requested it and I thought what the heck! It is really good. And I don't like jalapenos. I always have a little dab of jam left after my jars are filled that isn't enough for a jar but is too much to waste. I generally put this in small amount in a little jar in the fridge for the kids to use. That jalapeno jelly was taunting me to taste it. I just knew that I didn't like jalapeno so I just knew I wouldn't like jalapeno jelly. After a while, I caved and tasted it...it's freaking awesome! The kids didn't get any of that little dab of jelly left over...LOL
I had given the neighbors baskets of jam and jelly for Christmas and I had one come back to me, empty jars in hand telling me he loved the triple berry jam and asking me if I could make him a triple berry-jalapeno jam. What the heck, I'm going to give it a try.
This got me thinking about more exotic flavors. I threw out an idea to my friends. I am going to make several different types of jam and have them be my guinea pigs to taste them and tell me what they think. I have great friends that are willing to do this!
I'm thinking of picking a few of these flavors to try out: Pear butter, Peach butter, Banana bread butter, pear basil jam, spiced pear jam, tomato jam, carrot cake jam, raspberry moscato jam, triple berry jalapeno, strawberry peach, pomegranate bluberry and strawberry kiwi. I'm still on the look out for new flavors.
In the future, I'll post about directions on how easy it is to can jam and jelly. Right now, I'm just in the thought process about new flavors and all the exotic combinations that are now in vogue.
So tell me, what's your favorite jam, jelly or butter?
Subscribe to:
Posts (Atom)